
Why this helps
A local edit lets you fix one detail without rebuilding the entire scene. Whole-image editing is useful when the intended change, such as a warmer overall tone, affects the full image.
Open an image you created and select Edit image. Editing availability and generation limits depend on your workspace.
Choose the right editing mode
| Mode | Use it when… |
|---|---|
| Change an area | Remove an object, correct unwanted lettering or change a specific detail. Paint the area first. |
| Change the whole image | Adjust the overall light, colour treatment or mood. No local mask is used. |
In the editor, the mode buttons are labelled An area and Whole image. Both work on the selected image.
Make a precise local change
Open Change an area
On your image, select Edit image → Change an area. Use Brush to paint over what should change. Adjust the brush size for the detail and use zoom controls when needed.

Use the selection toolbar to paint precisely and correct a mask.Brand Asset test workspace · 5 November 2026 · select the image to enlarge. Check the full effective edit area
Paint the complete detail you want to change. Use Erase to remove accidental selection, Undo to reverse a stroke or Clear selection to start again. Move lets you navigate the image without painting.
The mask legend distinguishes Painted, May be adjusted and Blend edge. The affected area extends beyond the brush stroke to let the edit blend into the image. Check the outer dark line, especially near objects you want to preserve.
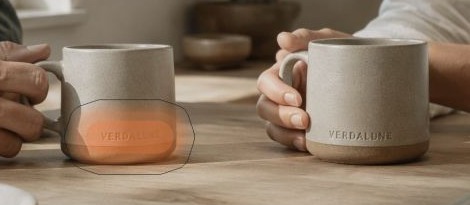
The orange stroke targets the lettering. The surrounding boundary shows the full area that can be adjusted.Brand Asset test workspace · 5 November 2026 · select the image to enlarge. 
Use the legend and outer boundary to understand how far a local edit can extend.Brand Asset test workspace · 5 November 2026 · select the image to enlarge. Pro tip · include the shadowWhen removing an object, mask its shadow and reflection if they should disappear too. A leftover shadow can make the removal look incomplete. Keep nearby objects outside the effective boundary.
Describe and run the change
Choose Remove, Change colour or Other change, or write a specific instruction in What do you want to change? Select Make change · 1 image generation when both the mask and instruction are ready.
“Remove the embossed lettering on the left mug. Keep the ceramic surface natural and leave the mug, hands and lighting unchanged.”
Compare Before and After
Use the Before and After buttons to check the same region in both versions. Inspect the edited detail, the blend edge and nearby texture. Select Adjust change to revise your selection or instruction. New suggestion makes another attempt and uses another generation.
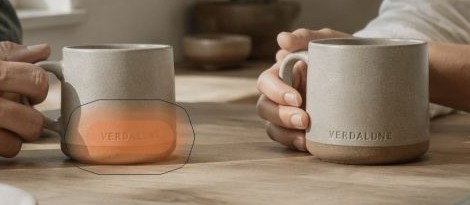
Before: the original lettering is still visible beneath the selection overlay.Brand Asset test workspace · 5 November 2026 · select the image to enlarge. 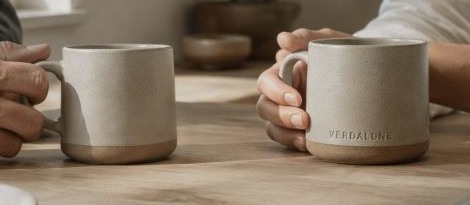
After: check the ceramic texture, edge and nearby details before keeping the suggestion.Brand Asset test workspace · 5 November 2026 · select the image to enlarge. Keep a new draft
Select Keep version. The result becomes a new draft; the original remains available. Check the new version’s score and warnings before sending it for approval. Closing an editor with an unsaved selection can show Close without saving? so you can return to editing instead.
Keep version saves a new draft. New suggestion uses another generation.Brand Asset test workspace · 5 November 2026 · select the image to enlarge. Rule · keeping is not approvalA kept edit still needs review before use. It must meet the same 80% image compliance requirement as other images.
Adjust the whole image
Select Whole image
Choose Edit image → Change the whole image, or switch to Whole image inside the editor. Describe an overall change such as slightly warmer daylight or a calmer background.
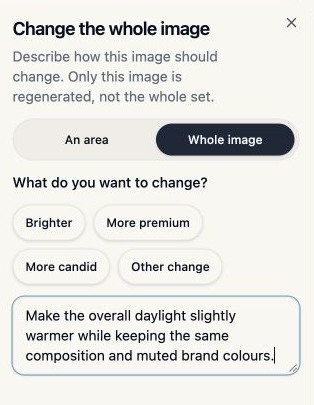
Whole-image mode regenerates the selected image. It does not protect unmasked areas in the way local editing does.Brand Asset test workspace · 5 November 2026 · select the image to enlarge. Review and keep the suggestion
Select Make change, then compare Before and After. Check the whole image for unintended changes to people, product details and framing. Keep the version only when those details remain acceptable.
Do’s and don’ts
| Do | Avoid |
|---|---|
| Use a small mask for a small correction. | Paint the whole image to remove one detail. |
| Check the expanded boundary and blend edge. | Assume only the orange brush stroke can change. |
| Use plain, specific instructions. | Combine unrelated changes in one request. |
| Keep a result you want to retain. | Rely on an unkept suggestion as a saved asset. |
The interface shows the generation cost and remaining daily allowance. Unkept suggestions have limited retention; save useful results with Keep version.
If an edit is not right
Why is Make change disabled?
In area mode, paint a selection and enter an instruction. Check the workspace’s remaining generation allowance and wait for any running edit to finish.
The object disappeared but the shadow remains.
Choose Adjust change, extend the selection to cover the shadow and make another attempt.
The result changed an important product detail.
Do not keep or submit it. Return to the original, use a tighter effective mask or choose a more suitable instruction. Product identity still needs human review.
Why can’t I find Edit image?
Editing must be enabled for your workspace, and you can only edit images you own. Ask your Company Admin if you expect the option to be available.